5. The QbTest Software
5.1 Personal user account
Objective:
In this chapter you will learn more about your personal user account and how to change your password.
Personal user account
Before you can start using the QbTest software you need a personal user account. If you have not received one prior to undergoing this online training, please contact your Clinical Advisor at Qbtech so they can create a user account for you and send you your login details.
Account security
Due to GDPR requirements and protecting your patient data, it is important that you keep your account details secure and only use your individual account when administering QbTest or accessing the QbTest Administration Tool to retrieve patient reports. You should never disclose your login details to anyone, nor should you use your colleagues’ user accounts to log in. Part of keeping your account safe is to change your password the first time you log in.
Your username will start with your clinic ID number. This cannot be changed as it is linked directly to the database of the service you work for. However, your randomly generated password can, and should, be changed. A safe password should contain at least 6 characters, a mix between numbers and letters both in lower and upper cases. Special characters such as ! . /, etc. may not be used.
How to change your password
To change your password, please log onto the QAT from any computer: https://eu-qat.qbtech.com/
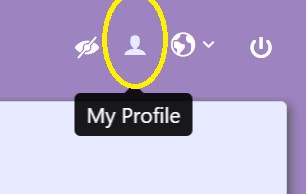
Enter the username and password assigned to you and click the Login button. On the top right of the screen, click on the person icon to enter the “My Profile” section as seen below:
Locate the second box down on the left titled “User Information” and click on the Action Menu. From the dropdown box, select the Change Password option:
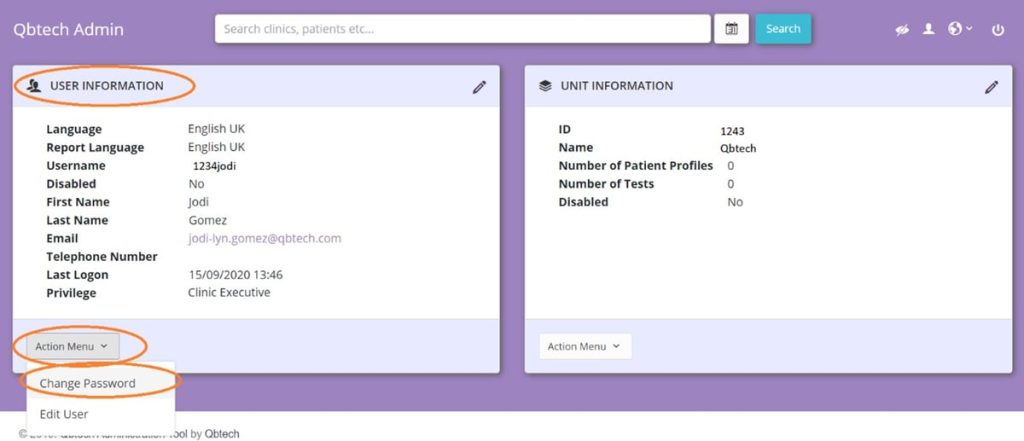
Here you will be prompted to enter your new password twice. Confirm by clicking “OK.” Your password will now be saved. You can log out of the database by using the Log Out icon at the top right of the page.
Summary:
- You will need a personal user account to administer a QbTest, as well as access the QbTest Administration Tool to retrieve patient reports.
- Keep your user account details secure to protect patient data and patient integrity.
- The first time you log on with your user account, change your password.
- Choose a safe password containing at least 6 characters, a mix between numbers and letters both in lower and upper cases. Special characters such as !,/%&#”)=/ å ä ö.. etc may not be used.
- You can change your user details by logging into the QbTest Administration Tool (QAT).
5.2 Test a new patient – create patient folder
Objective:
In this chapter you will learn how to test a new patient by creating a new patient folder and filling out necessary data.
When you test a new patient, the QbTest software will automatically create a patient folder containing the patient demographics that have been entered. All subsequent tests for this patient will then be saved into their patient folder. This is important as it allows you to compare the test results when a patient has undergone more than one QbTest. If you use different patient IDs for the same patient, the tests will sit in different folders and cannot be compared to one another.
Step 1: Choose test version
Start by choosing the appropriate test version depending on your patient’s age, QbTest (6-12) or QbTest (12-60). Then answer the question – “Does the patient have a registered Patient ID in QbTest?”. Click ‘No’ to continue.
Step 2: Enter patient demographics
Each patient folder needs to have a unique Patient ID. QbTest will automatically generate a random and unique patient ID, however, you may prefer to use a different ID such as the same ID that the service/clinic uses to identify the patient’s medical records. In order to comply with Data Protection legislation it is important that the ID numbers/letters you choose does not directly identify the patient; it should not include the patient’s name, initials or any other number/information that directly may be linked back to the patient. Whichever you choose, remember to note this identifier for later reference.
In addition, you need to fill in the patient’s date of birth and biological sex. It is important that this information is correct, as this will affect which norm group the patient will be compared to. However, if you realize at a later point in time, that some of this information was entered incorrectly, please contact your Clinical Advisor or technical support to edit this within the database.
Step 3: Enter treatment information
In this dialogue box you may enter additional patient information concerning treatments that they are taking at the time of this specific test. Use the drop down menu to select from a list of ADHD medications and then, enter the dosage and record the number of hours and minutes since intake. Always check this information carefully with the patient/parent, as inaccuracies may cause the report to be incorrectly interpreted. We also recommend that you enter any non-ADHD type of medications that might affect the test results into the ‘other treatments’ box.
Please remember if the patient is taking ADHD medication at the time of testing, it is mandatory to enter this information. Likewise, if the patient usually takes ADHD medication, but has ceased taking it to undergo the QbTest, do not enter that information here. Both the omission and addition of this crucial information respectively, can gravely affect the interpretation of results.
If the patient is currently not receiving any treatment just click ‘No treatment.’
Then click ‘Next’ to continue.
Step 4: Enter diagnostic data
In this dialogue box you may enter information about your patient’s diagnoses. If the patient has been diagnosed with ADHD you may select the relevant ADHD diagnosis either using the DSM or ICD codes in the drop down list. There is also room to enter diagnostic categories for co-existing disorders from the second drop down menu.
Additional information can be added in free text format in the field provided. If the QbTest is part of an assessment, choose ‘No diagnosis / Under evaluation.’
Click ‘Next’ to continue.
Step 5: Enter additional information
To have the system automatically work out the patient’s BMI, you may opt to include his height and weight in this section as well as any other notes that you would like to appear on the report. If not, you may just ignore this section and move onto the next section.
Finally
You are now ready to bring the patient into the test room. The patient folder will be saved when the QbTest results have been submitted for analysis!
Summary:
- Before a new patient enters the test room you need to create a new patient folder.
- To create a new patient folder, fill in patient data consisting of Patient ID, date of birth and biological sex, diagnostic and treatment data.
- When creating a new Patient ID either choose the QbTest automatically generated ID, or enter your own customized ID that your service would like to use. In order to comply with the Data Protection legislation it is important that the Patient ID that you choose does not directly identify the patient; it should not include the patient’s name, initials or any other number that can directly be linked back to the patient.
- Remember to note the Patient ID for later reference.
5.3 Retrieve an existing patient folder/Re-test a patient
Objective:
In this chapter you will learn how to retrieve an existing patient folder for when you are re-testing a patient. This is preferably done before the patient enters the test room.
When you re-test a patient, always retrieve the existing patient folder so that all the test results for any given patient are saved in the same folder. This also allows you to use the comparative reports available when you look at the test results.
If you create a new patient folder by mistake
However, if you do create a new patient folder by mistake, maybe you were not aware that the patient had been previously tested or you are testing off-line, it is possible to merge 2 folders. Please contact technical support for assistance with this.
Re-testing an existing patient
Choose the correct test version and then click ‘Yes’ in response to the question ‘Does the patient have a registered Patient ID in QbTest?”
You will be prompted to log in to your QbTest user account in order to retrieve your patient’s details from the Qbtech server.
Once you have logged in, the dialogue box Open patient folder will appear on the screen. This dialogue box allows you to search for the relevant Patient folder.
Search for an existing folder
After choosing the correct test version and responding to the question, “Does the patient have a registered Patient ID in QbTest?” by clicking ‘Yes,’ you can search for the existing patient folder. A list of folders will appear on the screen in a descending order with the last performed test at the top.
The easiest way to search for the Patient Folder is to enter the Patient ID, in the search field and then click ‘Search’. You may also search by entering the patient’s date of birth or test date of the last test. Choose the correct patient folder.
Enter patient treatment and diagnostic data
You will automatically be directed to the treatment dialogue in the patient folder you have retrieved. Fill in the treatment and diagnostic data in the same manner as when you created a Patient Folder for the first time. You are now ready to re-test the patient.
When re-testing
Remember to administer the test in the same way each time the patient performs QbTest to standardize the test situation. Even if a patient is being retested the same day, the administrator must deliver all instructions in the same standardised manner.
Summary:
- In order to ensure that you can generate comparison reports when your patient performs a repeat test, you need to retrieve the patient’s original Patient folder that contains his first/other QbTest(s).
- To retrieve the ‘Patient folder’ choose the appropriate test version depending on your patient’s age. Continue by clicking ‘Yes’ on the question ‘Does the patient have a registered Patient ID in QbTest?’
- Search for your patient’s folder by using Patient ID, date of birth or test date.
- When you located the right patient folder, click on it once to highlight it and then click ‘Next’ to continue
- Then fill in the treatment and diagnosis data in the same manner you would when you create a Patient Folder for the first time.
5.4 Retrieve and open reports
Objective:
In this chapter you will learn how to retrieve and open reports for a patient that has completed a QbTest.
Retrieving Reports
You can retrieve and open QbTest reports by accessing the QbTest Administration Tool (QAT) from your home or office computer at: https://eu-qat.qbtech.com/
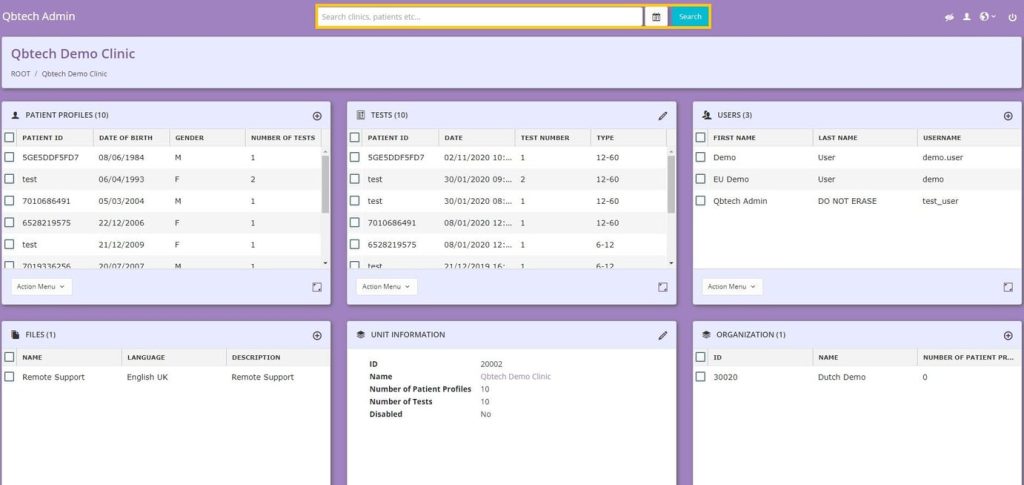
To retrieve the reports, log on with your individual username and password as usual. When you enter the QAT you will see a box with a list of all patient profiles on the left and all tests conducted at your service on the right.
Search for the report
By default, the list of patient profiles/folders and tests will be displayed in a descending order with the most recent test performed at the top of the list. To retrieve a patient folder, you may search for it in a number of different ways.
Usually, the easiest way is to enter the ‘Patient ID’ in the search field at the top of the Qbtech Admin page and click ‘Search.’ If you enter the full ‘Patient ID’ only the correct folder will be displayed on the screen. If you enter part of the Patient ID, any patient folders/tests with an ID corresponding to the partial ID you entered will be displayed.
You may also reorder the “test date” or “birth date” columns to chronological order, by clicking on them, and then search for your patient by the date their test was conducted or their birth date.
To open and print the report
When you have found the folder you are searching for, click on the row of the patient folder you would like to open and it will automatically open. In the box on the left, you will see all tests performed by the patient, and in the box on the right, you will see the patient information.
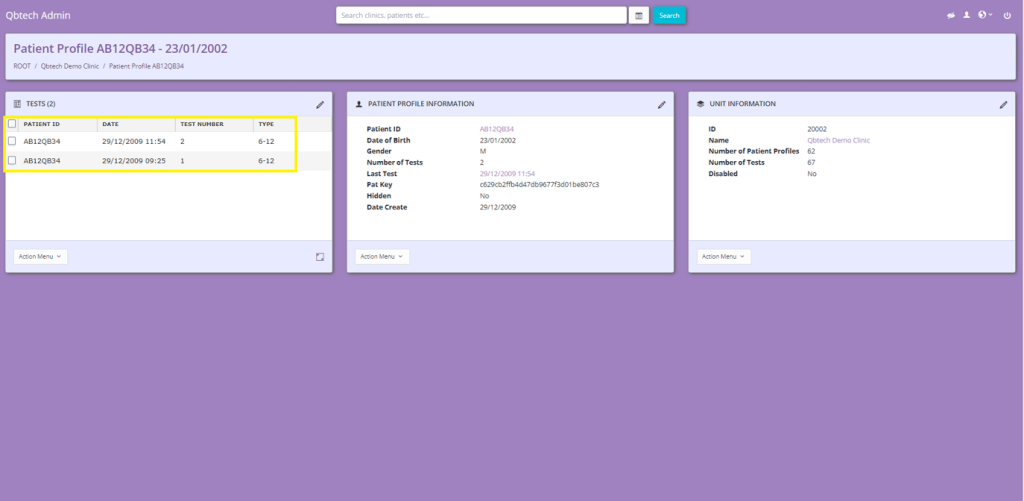
In the box on the left, click on the row of the test you would like to open. This will automatically open and show you all the reports available for that particular test, as well as the box on the left will show you options to compare those tests to (if the patient has been tested more than once).
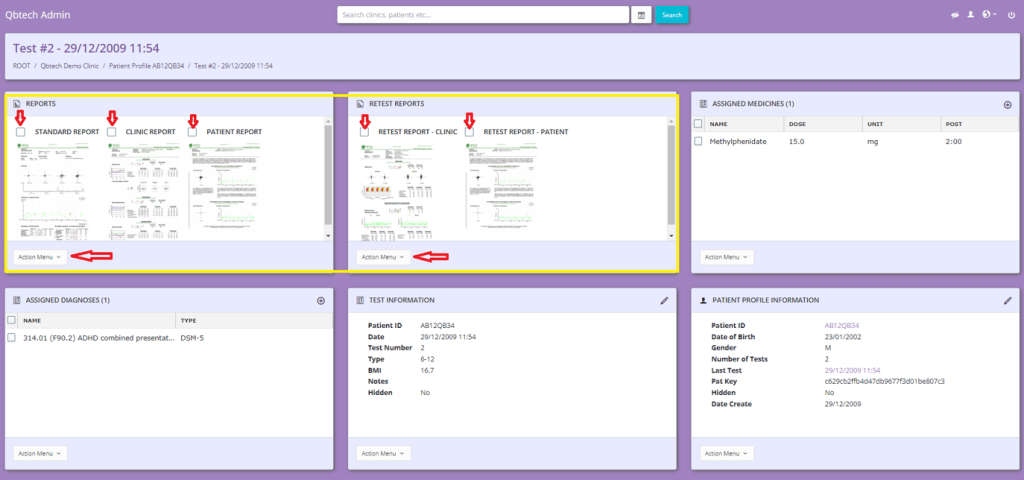
To open the reports, check the boxes of any reports you would like to see, either ‘Standard Report,’ ‘Clinic Report’ and/or ‘Patient Report.’ Click the box underneath the report icons called “Action Menu” and then select ‘’Generate Reports.”
A PDF file will appear with the reports you have chosen to view. If you would like to compare reports, use the box on the right of the screen and do the same as above, but when you click ‘Generate Reports’ it will ask what other reports you would like to compare that to. Select the reports you would like to compare the existing report to and click ‘OK’ and a PDF will pop up.
Summary:
- You can access reports by visiting the QbTest Administration Tool at https://eu-qat.qbtech.com/ from your home/office computer, smart phone or tablet.
- Enter the Patient ID, date of birth or test date in the search function to find the specific patient folder. Then click on the corresponding row of what test you would like to view, and it will open.
- To open a specific report, check the box of the corresponding report, click the “Action Menu,” and then select “Generate Report.”
5.5 Edit patient data
Objective:
In this chapter you will learn how to make changes to patient data after the patient has undergone QbTest.
If you realise that errors were made when entering patient data, you will need to contact technical support to request that changes be made in the database.
Please email technical.support@qbtech.com to advise what needs editing within the patient folder. It is advised you provide as much information as possible to ensure that they can locate the correct test that needs adjusting.
If there are errors in patient ID, date of birth or sex, please provide the current details as they were entered at the time, as well as the details of what you would like it to be changed to. Technical support will be able to make the necessary edits and email you to advise when you can retrieve the updated reports.
Reminder
If you have saved a digital or paper copy of the original reports in your records before changes were made in the system, please remember to update the records with the edited version as results may vary based on different comparison groups.
Summary:
- It is possible to edit patient data after the patient has undergone QbTest.
- Send an email to technical.support@qbtech.com with the current information, as well as changes that need to be made.
- If you have saved a digital or paper copy of the reports in your records, please remember to update the records with the edited version.
Test your QbTest Administration knowledge
Now that you have completed all 5 modules on Administration, it is time to test your knowledge.
You will be tested based on the material covered in this course. To pass this course you will need to answer all questions correctly. Once you achieve 100%, you will be issued a certificate of completion, your user account will then become active and you will be authorized to Administer QbTest and retrieve patient reports from the QbTest Administration Tool (QAT).
There is no time limit and you have an unlimited number of attempts.
Take time to review the chapters if needed, otherwise continue to the test by clicking on the button below.
Good luck!