1. Introduction
The objective of this first chapter is to provide basic information about QbTest regarding:
- Overview of QbTest
- How to assemble the QbTest hardware
- How to navigate the QbTest software
1.1 Introduction to QbTest
Objective:
In this chapter you will learn the basics about QbTest.
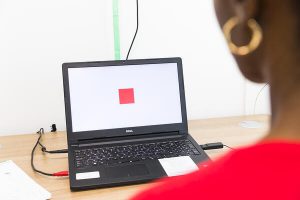 QbTest is a medical device that objectively measures cognitive performance and activity levels. QbTest combines a computer based task with a high resolution motion tracking system that uses an infrared camera to follow a reflective marker that is attached to a headband.
The test objectively measures the three core symptom domains of ADHD: hyperactivity, inattention and impulsivity, to provide quantitative assessment of a patient’s activity level, ability to pay attention and inhibit impulses. In addition to the Quantified Behavioural Test (QbTest), the patient performs an Ability Test that provides important information regarding the patient’s ability to manage the test situation.
The QbTest system consists of a laptop, which displays the task, a response button, a headband with a reflective marker and an infrared, high-resolution camera that tracks the movement of the reflective marker throughout the test. The test is available in two versions QbTest (6-12) and QbTest (12-60), depending upon the patient’s age.
The test is CE-marked, registered by EMA (the European Medicine Agency) and cleared as a class II device by the FDA (Food and Drug Administration in the United States).
QbTest 6-12 version
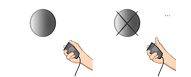 The task for QbTest (6-12) involves the rapid presentation of two types of stimuli: 1) the Target which is a grey circle that the patient is to respond to by clicking the response button, and 2) the Non-Target which is a grey circle with a cross over it, that the patient should not respond to thereby inhibit his/her impulsivity. In QbTest (6-12) a total of 450 stimuli are shown over 15 minutes, with an equal number of Targets and Non-Targets, displayed in consistent intervals. Every two seconds a stimulus will flash on the screen before disappearing. The patient then has two seconds to respond before a new stimulus appears.
QbTest 12-60 version
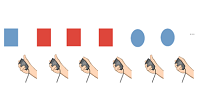 QbTest (12-60), presents a task with a slightly higher cognitive load and involves the rapid presentation of four possible symbols; a red or blue circle, or a red or blue square. In this version, a stimulus is defined as a Target if it is identical in shape and colour to the stimulus immediately preceding. It is defined as a Non-Target if it is does not identically match the stimulus immediately preceding it. In QbTest (12-60) version, 600 stimuli are shown over 20 minutes, displayed in consistent 2-second intervals, with a 25% Target ratio.
The order of the Targets and Non-Targets in both test versions is semi-randomized to prevent practice effects in cases where the test is repeated.
QbTest results are displayed in clear reports
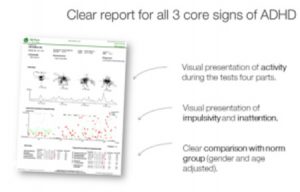 As soon as the test is finished, the results are automatically sent to our software for scoring based on an age and sex referenced normative group. The test results are presented in a clear report showing all three core symptom areas of ADHD both visually and statistically.
Summary
- QbTest is a medical device that uses a computer administered test and motion tracking system to measure all three core symptoms of ADHD
- QbTest meets a high standard and is approved by EMA and cleared by the FDA
- Two versions with age adjusted tasks are available; QbTest (6-12) & QbTest (12-60)
- Clear reports with visual presentation of attention, hyperactivity, impulsivity and statistical comparisons to age and sex reference normative groups.
1.2 Hardware & Assembly
Objective:
In this chapter you will learn how to assemble QbTest hardware
A complete QbTest system consists of the following components:
- Test computer with the QbTest software
- A power cord for computer
- A camera
- A camera stand/tripod
- A USB cable
- A responder button
- A headband with a reflective marker
How to assemble the QbTest system
Equipment for set up with tripod *
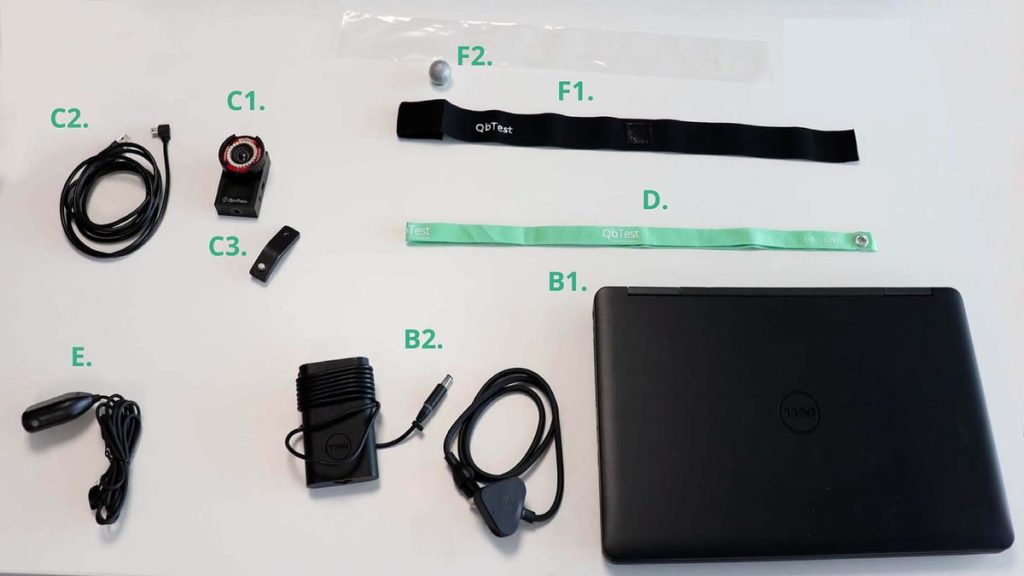
* for use with tripod provided
Setting up the tripod and camera
To set up the tripod, use the bottom lever, and spread the legs of the tripod to create a stable stand. To assemble the camera on top the tripod, unscrew the black protective cap from the top of the tripod, and secure the angled bracket onto the screw at the top of the tripod. Ensure that it is angled downward, with the attached screw facing upward.
To attach your 1m measuring tape, unscrew the screw from the underside of the angled bracket, place the larger eyelet of your green measuring tape over the screw and then attach the screw back into the hole.
Finally, to mount the camera, screw the camera on top of the screw. The camera should be securely in place, stable and facing forward. Make sure it is not loose and cannot spin. If it is not secure, there is a washer provided to help achieve this.
Please watch the video below to assist you in assembling your camera and tripod:
Camera wall mount installation
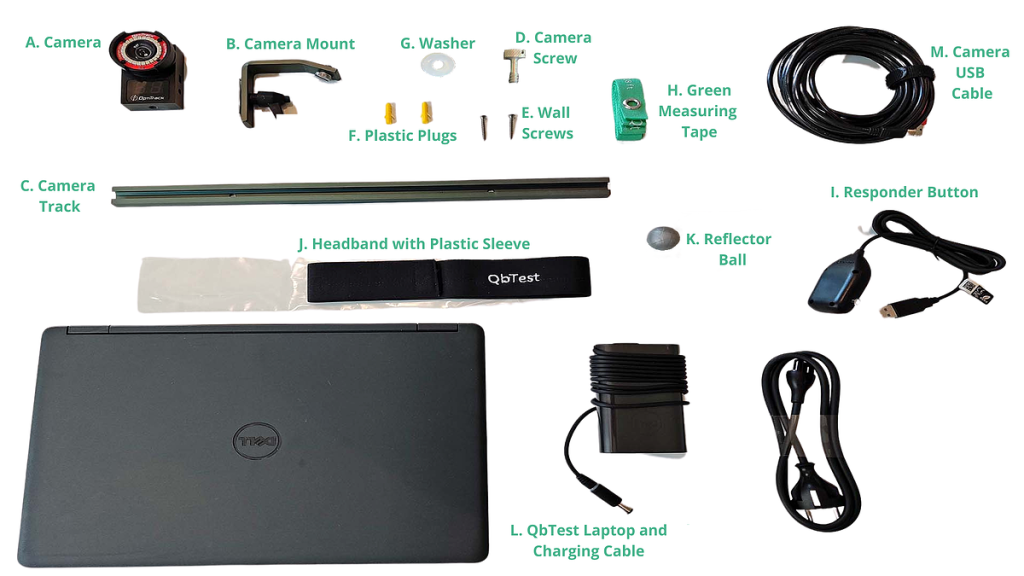
The QbTest camera wall mount contains one rail, one bracket, one camera screw, two wall screws, two plastic plugs, one spacer and a measure tape (see picture 1).
Please follow these instructions before attaching the QbTest camera to the wall mount:
- Select a wall where you want to attach the wall mount
- Place the wall mount rail at a height of 135cm (measuring from the floor to the lower end of the rail)
- Attach the wall mount rail to the wall using the included screws (and plugs if needed). Make sure that the wall mount rail is securely attached to the wall
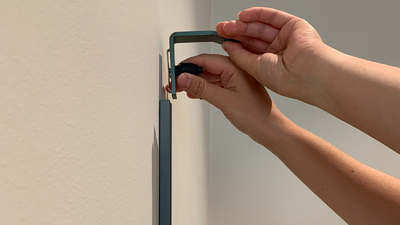
- Insert the wall mount bracket into the rail (see picture 2)
- Fasten the wall mount bracket to the centre of the rail by turning the bracket lever clockwise (see picture 3)
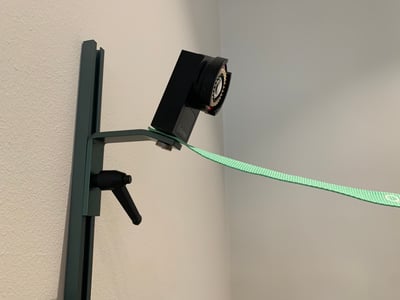
- Attach the camera screw, measure tape (or spacer) and camera according to picture 4
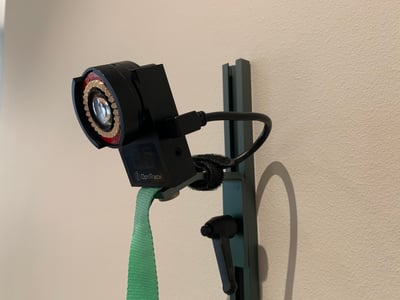
- Connect the camera cable to the camera and fasten it to the wall mount bracket according to picture 5
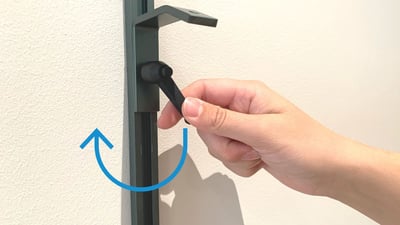
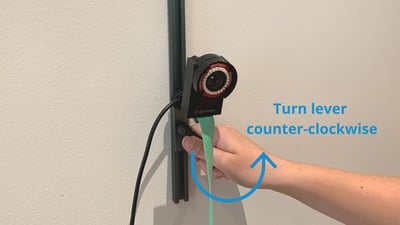
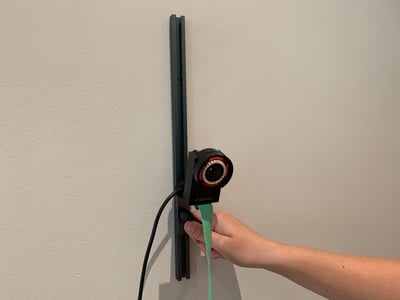
When adjusting the height of the camera, first loosen the bracket from the rail by turning the bracket lever counter clockwise (see picture 6). Then move the camera to the target height (see picture 7) and secure it by turning the bracket level clockwise (see picture 8).

If the lever is stuck, follow these instructions:
- Gently pull the level away from the wall
- While applying outward tension, turn the lever clockwise
- Gently release the lever
- Turn the lever counterclockwise to release the bracket from the rail
Please watch the video below to assist you in assembling the wall mount:
Setting up the laptop
To set up the laptop, connect the two parts of the power cord and attach the power cord to the laptop. Then plug it into a power source (ensure the switch is on).
To set up the responder button, remove the protective casing and twist tie from the responder button and plug it into any of the USB ports on the laptop.
To connect the laptop to the camera using the USB cable, this will be plugged into any USB port on the laptop and the smaller end goes into the camera. Ensure that the cord does not pull the camera in either direction.
Place the tripod behind the laptop (either on the table behind the laptop or on the floor behind the table – this may vary based on the size of your table and the height of your patient)
Please see the video clip below to ensure you set up the system correctly.
Using the headband
Before each new patient, ensure you replace the plastic sleeve on the headband. This is done by removing the magnetic reflector marker, discarding the old plastic sleeve, and placing a new one over the headband. Reattach the magnetic reflector marker.
Please see the video below.
Summary:
A full system consists of: a test computer, a power cord, a camera, a tripod or wall mount, a USB cable, a responder button, a measuring tape and a headband with a marker.
1.3 Overview of the QbTest software
Objective:
In this chapter you will learn how to use the QbTest software
Getting started
Before using the QbTest software, you will need to have a user account set up for you by your Clinical Advisor at Qbtech. Please contact your Clinical Advisor if you do not have a user account.
To start a QbTest you will need to turn on the laptop using the power button.
When prompted to log in to the computer, the Username is QbTest and the password is the string of letters and numbers next to the word ‘Service Tag’ on the sticker on the bottom right-hand side of the laptop beneath the keyboard. This is case sensitive. Before you begin, you should ensure you are connected to the internet.To run the QbTest program, click on the icon on the left of the screen.
Once you open the QbTest program you will see the following:
Main menus

The software contains 2 main menus ‘File’ and ‘Help’.
‘File’– contains options related to software support. For example:
- Change the default language of the QbTest software on your computer.
- Log in/Log Out
- Exit the program
‘Help’– contains documentation on how to use QbTest. For example:
- Patient Consent Form
- Contact Us
- Frequently asked questions
- About QbTest
Main tabs

The software contains three main tabs: ‘Start Test‘, ‘Administration‘ and ‘Outbox‘.
‘Start Test‘ – To begin administering QbTest, choose the correct test version depending on your patient’s age. Then enter any relevant patient information in a series of easy to follow dialogue boxes.
‘Administration‘ – enables you to access tests that you have previously administered. To use any of these functions you need to be connected to the internet.
‘Outbox‘- Tests that were completed offline will be stored here. For reports from these tests to be generated, it is necessary to connect the laptop to the internet, select the tests in the outbox, and then click on the ‘send’ button. Until you have done this, the tests will remain on the laptop and no reports will be generated.
Summary:
The software contains two main menus ‘File’ and ‘Help’.
- Under ‘File‘ you can log in/out of your personal user account, exit the program etc.
- Under ‘Help‘ you can find documentation on how to use the software. You can also find contact details to our technical support team and a link to frequently asked questions.
The QbTest software has three main tabs: ‘Start test’, ‘Administration’ and ‘Outbox’.
- Under ‘Start Test’ you start the QbTest by clicking on the icon for the correct test version depending on your patient’s age.
- Under ‘Administration’ you can retrieve reports, and change/edit patient data
- Under ‘Outbox’ you can manually send a test to generate a report, if it was performed offline.